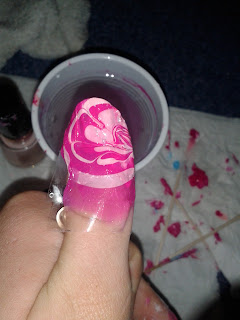
Water marbling is a really fun, interesting design. It looks really unique, effective and interesting, and it is also really fun to do!
Here are the things I used/What you will need:
Light Pink:Revlon-Pink Petal (discontinued? No links available)
Some toothpicks
A cup of room temperature water
Cellotape (I pre cut mine, to try and avoid it peeling off the white polish, to do this 20 pieces, each about 2 inches long)
Firstly, apply a base coat, to protect the nail and create a smooth surface.
Next, apply 1 coat of white polish (there isn't a need to make it opaque because polish will be going over it, but this helps to brighten the colours.
After this, apply the strips of tape. Each finger will need 2 pieces (sorry I forgot to photograph this step! But I will try to describe it). On each finger, one piece of tape needs to go around the bottom of the nail, and the other needs to go behind the nail, and around the sides.
Now we are going to do the water marbling. I would recommend using room temperature water for this, as it is most effective at spreading the polish. I also recommend using fairly liquidy polishes, so they drop easily onto the water.
You can use a variety of colours, you could do a rainbow! But today I am using 2 colours.
Take your 1st colour, and hold the brush over the water, so that it dropd onto the water, it should spread out over the water to create a thin film (if it only creates a circle, don't worry!) After this, using the same colour, and add another drop, to make an opaque circle (if yours only made a circle that didn't completely spread out, you may not need to add another drop).
When you have finished doing the drops of polish, take your toothpick. Quickly, before the polish dries, lightly drag the toothpick over the polish to create a swirly design. This is where you can be creative, do any design you want! I did a swirly design, but one clever design is where you drag the tooth pick from the outside inwards, from lots of different points, and it creates a flower design! This could create a really cool petal effect on your nail. You need to create your design quite quickly, because if it dries, then the polish will just stick to the toothpick, and mess the design up..
Once you have created your design, dip your nail into the polish, and leave it underwater for a few seconds. Blow on the water to make sure the polish is dry. Then, use a toothpick to clean up excess polish around the finger.
Then, you can remove your finger on the water, and you should have something that looks like this:
Wait for it to dry a little bit, and then remove the tape. Personally, I removed the tape after I had done all my nails, to avoid excess hassle.
It is most likely that you will still have polish on your skin, so this needs removing! I used the Barry M polish remover pen (I really recommend these pens, they are a lifesaver! This is a cheap version, but I am aware that brands such as OPI also do a remover pen) to remove the polish around the nails. If you don't have this, use polish remover and a cotton bud (aka a "q-tip").
Add a top coat and you are done!
I love this design, it is really creative, interesting and unique.
Send me your recreations!
Follow and share me on all my links!
Genny xx
Once you have created your design, dip your nail into the polish, and leave it underwater for a few seconds. Blow on the water to make sure the polish is dry. Then, use a toothpick to clean up excess polish around the finger.
Then, you can remove your finger on the water, and you should have something that looks like this:
Wait for it to dry a little bit, and then remove the tape. Personally, I removed the tape after I had done all my nails, to avoid excess hassle.
It is most likely that you will still have polish on your skin, so this needs removing! I used the Barry M polish remover pen (I really recommend these pens, they are a lifesaver! This is a cheap version, but I am aware that brands such as OPI also do a remover pen) to remove the polish around the nails. If you don't have this, use polish remover and a cotton bud (aka a "q-tip").
Add a top coat and you are done!
Send me your recreations!
Follow and share me on all my links!
Genny xx
Twitter: https://twitter.com/GennyRosee
Also you can follow me on this actual blog, which would especially love you to do!


No comments:
Post a Comment